I typically travel with more than one camera. I like to shoot film, but since there is a limit to how many frames on a roll, I bring a digital camera so I don’t have to think about the limits. In my opinion, film is more permanent than digital (I’ve had a virus wipe out everything in the early days) so I reach for film when I want to be able to return to the image later when I have learned more about scanning or I’ve had a digital crash.
Today I’m returning to Death Valley to highlight a film session with a classic camera and another where I used a DSLR. My film camera was a Voightlander Vito B. According to Camera-wiki.org the Vito B was manufactured from 1954-59 as a viewfinder 35mm camera. It is very solid, made of metal, and completely manual. For the modern photographer it has a few quirks. First, being a viewfinder camera, it isn’t possible to see through the lens and focusing is accomplished by the zone system. There were rangefinder 35mm cameras in this era where a split image would align to ensure correct focus, but the Vito B isn’t one of them. Next, it has no light meter. I’ve written about this camera a couple of times in the past. If you would like to take a look at my thoughts about it, you can go to any of these previous posts. I had an accessory rangefinder focusing attachment for the camera that was useful for close focusing.
Previous posts about the Vito B:
https://davewaltersphotography.wordpress.com/2019/02/02/the-search-for-a-good-street-photography-camera/ https://davewaltersphotography.wordpress.com/2020/04/30/three-cameras-so-close-and-yet-so-far/
The Vito B is very compact. It is not only ideal for street photography, but also a good choice when space is an important factor. Death Valley has good images to give in black and white and color. On this trip I chose Kodak Gold 200 film. Kodak Gold has been around since the 1980’s and has been a big consumer film. Instead of using a stand-alone light meter, I metered using the Sunny 16 rule and focused at infinity.
This picture of Zabriskie Point in Death Valley was taken at sunrise. The valley has an east/west orientation, so the sun was at my back as it illuminated the scene. The National Park Service has made a nice short road and parking lot that overlooks the scene. It is at the north-east of the park off Highway 190, the road you would use coming from Las Vegas.

Christian Zabriskie was a prominent figure in the Pacific Coast Borax Company, according to the National Park web page about Death Valley. The hill is named for him. With an overlook of the valley floor and the Panamint Range in the distance, Zabriskie Point with its brown and yellow hills is a good place to see the badlands of Death Valley. According to the NP’s website, this 823 foot high point was carved by water, something we don’t associate with Death Valley.
The morning was crisp in a way that only the dessert can be. There was no breeze, so I didn’t have to be overly dressed in bulky clothing or in a hurry. We stayed until the sun was high enough that a good photo with the creases and lines of the hills was no longer possible to photograph. Even so, we had all day to enjoy the park ahead of us. When we left Zabriskie Point, we went and had breakfast.
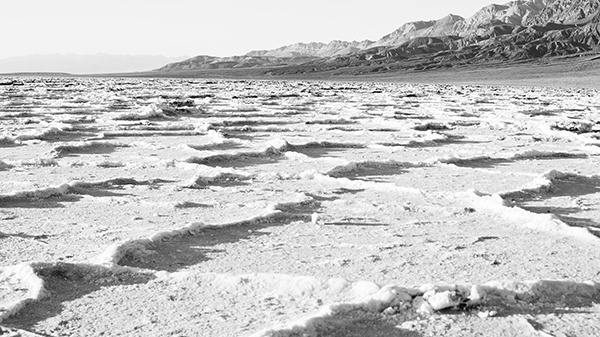
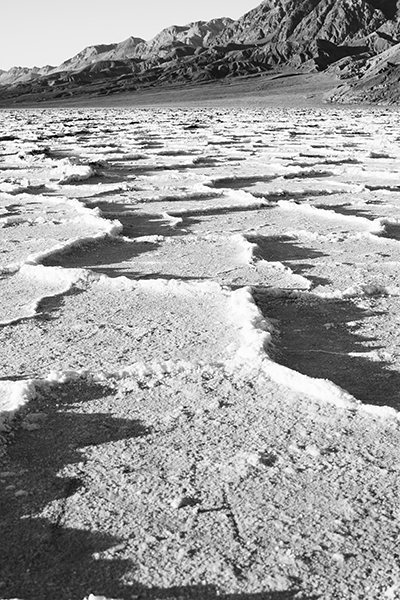
Going to the Badwater Basin I left the Vito in the bag and took my Nikon DSLR, a tripod, and a good pair of sunglasses. The lowest point in North American is also a big sink where the valley collects rainwater but has no exit. As the shallow water evaporates it leaves behind a white salty-like carpet of minerals. Unlike the early pioneers, I had sunglasses to reduce the intense refraction of the white landscape I would spend some time exploring and photographing. The effects of wind and water leave patterns that challenge visitors and photographers in a Rorschach-like design association exercise. When it comes to patterns and texture black and white is king.

A few photographic thoughts.
Our eyes are drawn to certain colors and color combinations. Have you ever noticed how anything red draws our attention? Depending on your purpose, this can be beneficial or distracting. At Zabriskie Point and Artist’s Palette color is our friend in both capturing the essence of the place but in our memories of the trip. At Badwater Basin, color is unimportant or distracting. The floor of Death Valley at Badwater is dirty white. What makes the landscape interesting is the patterns made by the minerals left behind, not the specs of dirt embedded within the minerals. In situations where color is distracting or an emphasis on patterns is the focus of the photo, black and white photography is still king.
On a digital camera I recommend changing the setting to black and white. The camera is still going to process the scene in color but it will display on the screen in monochrome, tones of grey. Why not just shoot in the regular color palette and make the change to color later on at home, you ask. That’s a great question.
Black and white film responds to the brightness of objects within the scene. Consequently, a light green and a light red will be recorded identically. But we can play with the color by inserting a filter in front of the lens to block some colors. The most common filters used in black and white photography are red and yellow. A red filter blocks blue colors in the scene. The result is higher contrast and more dramatic scenes. For example, blocking blue causes the sky to darken and the clouds to stand out. Yellow darkens skies also but brings out greens. Yellow is a good filter to bring out skin tones. The use of filters is one of the reasons to switch your camera to black and white in the field.
Your DLSR has options to use filters within the monochrome setting. Since the camera is shooting in color anyway, it uses red, green, and blue light sensors to make the photo, it can easily adjust that color when recording in grey tones of black and white photography. Of course, you will need to pull out the owner’s manual to get the settings right on your camera. You can also play with the filters in the field and see the effects of red, yellow, or even orange and green on the scene you are shooting.
Seeing in black and white in the field is the second reason to change the setting on your camera. Unless you are color blind, a common condition shared by 1 in 12 men and 1 in 200 women, you have to train yourself to see in black and white. Waiting until you get back home to change you photo to black and white will make it more difficult to purposefully use black and white on the next outing.